
BoS confirms the trend continues; CHoCH is the first structural warning that it may be ending. Treat a Break of Structure as permission to stay aligned with the trend, and treat a Change of Character as a flag to wait, not a green light to reverse. Which one applies depends entirely on the swing you’re watching, the timeframe you’re trading, and whether the break closed on the candle body or just wicked through.
TL;DR:
- A true break of structure (BoS) requires a candle close beyond the swing level, with a body close preferred on higher timeframes to confirm validity.
- Use consistent swing definitions, breach rules, and structure types (internal or external) to accurately differentiate between false and genuine BoS or CHoCH signals.
- Confirm a change of character (CHoCH) with higher timeframe alignment, liquidity sweeps, and retest zones like order blocks or fair value gaps for reliable entries.
- Always align lower timeframe entries with the bias set by higher timeframe trend analysis to avoid fighting the overall trend.
- Fix rules before trading sessions and avoid adjusting them in response to losses to ensure the method remains repeatable and objective.
Table of Contents
- What Is BoS and CHoCH in Price Action?
- How Do You Identify a Real BoS vs a False One?
- What Confirms a CHoCH Before You Trade It?
- How Do You Trade BoS and CHoCH Step by Step?
- What Mistakes Wreck BoS and CHoCH Trading?
- Why These Rules Matter: A Practitioner’s View
- BoS vs CHoCH: Which Should You Prioritize?
- Turn These Rules Into Repeatable Trades
- Sources
What Is BoS and CHoCH in Price Action?
A Break of Structure happens when price closes beyond the most recent swing high or swing low in the direction of the existing trend. It confirms continuation. A Change of Character happens when price makes the first break against that sequence, such as closing below the last higher low in an uptrend. It’s the first crack in the wall, not proof the wall is falling.
Here’s what makes this trickier than it sounds: identical price action can be labeled either way depending on which trend you’re already in.
- In an uptrend of higher highs and higher lows (HH/HL), a break above the last HH is a BoS. A break below the last HL is a CHoCH.
- In a downtrend of lower highs and lower lows (LH/LL), a break below the last LL is a BoS. A break above the last LH is a CHoCH.
Swap the trend context and the exact same candle close flips its label. That’s why traders who skip a written trend definition end up arguing over charts that show the same move. Our own breakdown of break of structure vs change of character walks through more annotated examples if you want to drill this further before moving on.
How Do You Identify a Real BoS vs a False One?
Labelling BoS and CHoCH consistently comes down to three decisions you need to lock in before you ever mark a chart: your swing definition, your breach rule, and whether you’re reading internal or external structure.
Swing definition. Decide your pivot length (how many bars on either side confirm a swing) and stick with it. A 3 bar pivot on a 15 minute chart will tag dramatically more swings than the same pivot length on a 4 hour chart, and switching pivot length mid analysis is the fastest way to invalidate your own backtest.
External vs internal swings. External swings are the major highs and lows that define the dominant trend. Internal swings are the smaller wiggles inside that structure, often used for early entries but far more prone to noise and false signals.
Breach rule. This is where most disagreements happen:
- Wick-beyond rule flags a break the moment any wick pierces the swing level, catching moves earlier but triggering more false positives.
- Body-close rule requires the candle to close beyond the level, filtering out liquidity sweeps that poke through and reverse.
A break confirmed only by a wick is frequently just a liquidity grab, not genuine structure. Most SMC traders default to requiring a body close on higher timeframes and reserve wick sensitivity for lower timeframe entries where speed matters more than confirmation.
Pro Tip: Write your swing length and breach rule down before you open the chart, and don’t change either mid session. Labelling drift, where you unconsciously loosen the rule to make a setup “work,” is the single biggest reason backtests don’t survive live trading.
A quick live checklist to run every time you mark structure:
- Confirm your bias timeframe and lock the pivot length for that chart.
- Tag the last two external swings in the current trend direction.
- Apply your breach rule (wick or close) consistently to both sides.
- Note the bar number or timestamp where confirmation occurred, for later review.
Locking these down in advance is what separates a testable market structure method from a chart that just “looks” bullish or bearish depending on the day.
What Confirms a CHoCH Before You Trade It?
A CHoCH by itself is a weak signal. It tells you momentum shifted, not that the trend has reversed. What separates a CHoCH that leads somewhere from one that gets swallowed back into the old trend is confluence, and there are three filters worth checking before you commit size.
Higher timeframe alignment governs everything. A CHoCH on the 15 minute chart inside an intact daily uptrend is often nothing more than a pullback getting mistaken for a reversal. Structure exists independently on every timeframe, and the higher timeframe sets the bias that the lower timeframe has to respect, not the other way around.
Liquidity sweeps add real weight to a CHoCH. When price sweeps through an obvious high or low (grabbing stops, inducing late entries) right before the character change, that sweep signals institutional participation rather than random drift.
Order blocks and fair value gaps (FVGs) give you somewhere to actually enter after the break, rather than chasing the breakout candle itself.
Combine those and you get a working pre-entry checklist:
- HTF trend context checked and noted (aligned or opposed).
- Liquidity sweep or clear displacement visible before the break.
- Retest zone identified: order block or FVG within the breaking leg.
- Breach confirmed by body close, not wick alone.
High probability CHoCH setups consistently show a liquidity sweep paired with HTF confluence; without those two elements, a standalone CHoCH carries low reliability on its own.
How Do You Trade BoS and CHoCH Step by Step?
Once your rules are fixed, the actual workflow is mechanical. Here’s the sequence we’d run on any pair, any session.
- Set your bias timeframe. Daily or 4 hour for swing trades, 1 hour for intraday. This chart tells you the direction you’re allowed to trade.
- Set your execution timeframe, one to two steps below bias (4H bias with 15 minute execution, for example). This is where entries actually trigger.
- Mark the last BoS and CHoCH on both timeframes so you have a visual reference for where structure last shifted.
- Wait for price to retest the broken level or tap into an order block/FVG left behind by the break, rather than chasing the breakout candle.
- Trigger the entry on the LTF once price reacts inside that HTF point of interest, using a smaller confirmation (a mini BoS on the execution chart works well here).
- Place your stop beyond the sweep or the swing extreme that defined the setup, not at an arbitrary round number.
- Target the next external liquidity pool or opposing HTF structure level, and size the position so that stop distance controls your risk, not your gut feeling.
Pro Tip: If your execution timeframe CHoCH doesn’t align with the bias timeframe’s last BoS direction, skip the trade. Fighting the higher timeframe on a lower timeframe signal is how good setups turn into avoidable losses.
Our guide on risk management rules new traders must know covers position sizing math in more depth, and the stop loss placement guide is worth a read before you finalize step six above.
What Mistakes Wreck BoS and CHoCH Trading?
Most losing trades built on structure come from a handful of repeat offenses, and every one has a straightforward fix.
- Mixing timeframes mid-analysis. Fix: freeze your bias and execution timeframes for the session and log any exceptions afterward.
- Accepting wick breaks as confirmation. Fix: require a body close on your HTF chart, and only relax that for scalping entries.
- Trading a CHoCH as if it’s confirmation. Fix: wait for a follow-through BoS in the new direction, or clear HTF confluence, before sizing in.
- Overtrading internal swing breaks inside a range. Fix: require an HTF point of interest before you take any internal structure signal seriously.
Why These Rules Matter: A Practitioner’s View
Rules only work if they’re written down and tested, not adjusted after the fact to fit a losing trade. That discipline (fixing pivot length, breach rule, and HTF filters before the session starts) is what turns BoS and CHoCH from a subjective chart story into a repeatable process, and it’s the backbone of how structured training and mentorship communities coach this skill.
— Gabriel
BoS vs CHoCH: Which Should You Prioritize?
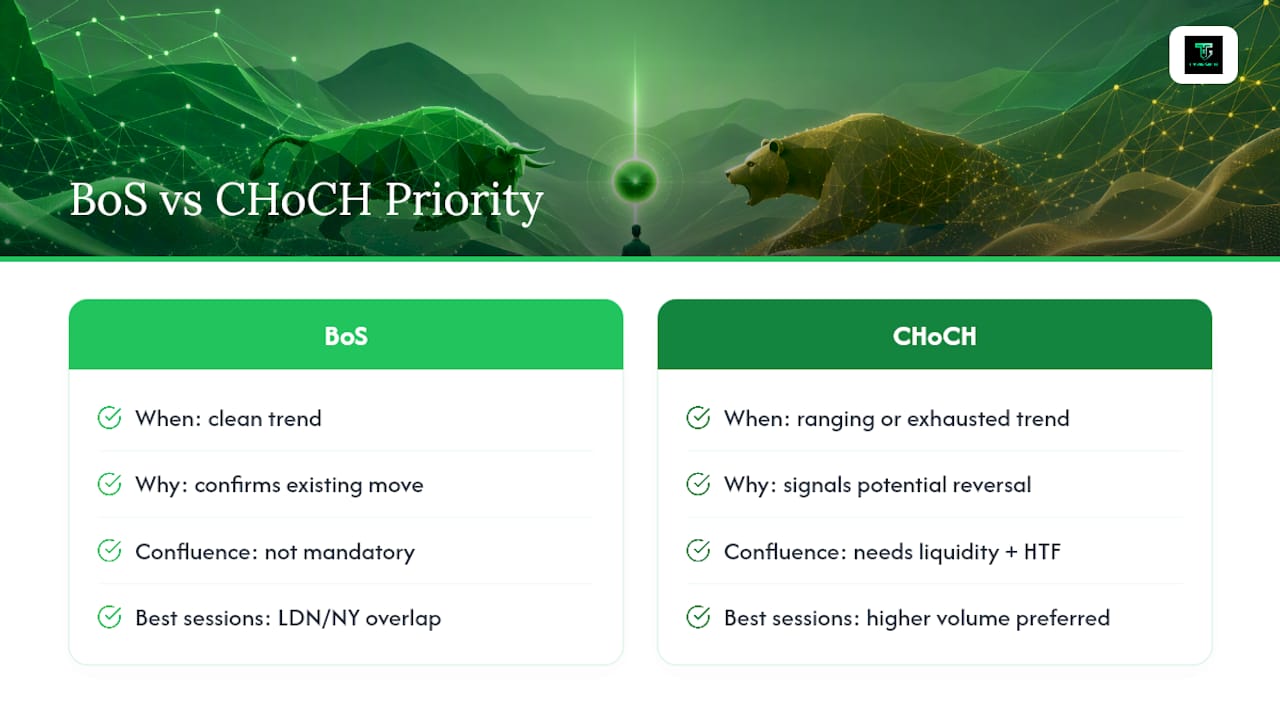
In a clean trend, prioritize BoS. It confirms what’s already working. In a ranging or exhausted trend, weight CHoCH more heavily, but only with liquidity and HTF confluence behind it. Higher volume sessions (London and New York overlap) tend to produce cleaner breaks with less noise. One rule worth taping to your monitor: never trade a CHoCH alone.
Turn These Rules Into Repeatable Trades
Reading a chart correctly once is easy. Doing it the same way, under pressure, on the fiftieth trade is where most traders fall apart. Tradergibkey exists for exactly that gap: structured courses, live trading sessions, and direct mentorship built around fixed swing rules, breach criteria, and HTF filters, not vague chart commentary.

Inside the program, you get access to live chart walkthroughs where BoS and CHoCH calls get made and reviewed in real time, journaling templates that force you to record your breach rule and pivot length before every session, and a private community where mislabeled structure gets corrected before it costs you money. Guided repetition, with feedback, closes the gap between knowing the rules and applying them consistently. If you’d rather practice this framework with feedback than alone, check out the Tradergibkey program and see which course or mentorship track fits where you are right now.
For traders who also use trade-copying tools alongside manual execution, this primer on risk management in forex trading is a solid companion read on position sizing discipline.
Sources
- Market Structure, BOS and CHOCH: Objective Rules for Traders · Traderizz
- BOS & CHOCH: Complete Market Structure Guide 2026