
An order block is defined as the last opposing candle before a significant impulsive move that breaks market structure in Forex trading. These zones mark where institutional traders, including banks, hedge funds, and algorithmic market makers, accumulated or distributed large positions before price moved sharply in one direction. Understanding order blocks gives you a structural edge because you are reading the same footprints left by the biggest players in the market. This guide covers order blocks explained from definition through execution, including how to identify them, trade them, and avoid the mistakes that cost most traders money.
What are the key criteria to identify valid order blocks?
Valid order block identification follows a specific sequence. Skip any step and you end up trading a random supply or demand zone with no institutional backing. Adhering strictly to the Break of Structure (BOS) requirement eliminates roughly 60% of false order block signals in Forex trading. That single filter separates high-probability setups from chart noise.
Here is the exact process for identifying a valid order block:
- Locate a significant swing high or low. You need a clear reference point in market structure before anything else.
- Find the impulsive move. Look for a strong, fast candle sequence that breaks the prior swing high or low. Slow, grinding moves do not qualify.
- Identify the last opposing candle before the impulse. If price moved up sharply, the order block is the last bearish candle before that move. If price moved down sharply, it is the last bullish candle.
- Confirm the Break of Structure. The impulsive move must close beyond the prior swing point. Without this, the zone has no structural validation.
- Check for a Fair Value Gap (FVG). High-probability order blocks appear on higher timeframes and are confirmed by the presence of a Fair Value Gap or imbalance in the impulsive move following the block. An FVG shows that price moved so fast it left an unmitigated gap, confirming institutional force.
- Assess freshness. A fresh order block has never been retested by price. A mitigated block has already been touched once and its institutional liquidity is partially or fully absorbed.
Candle quality and timeframe selection
The order block candle itself matters. A clean body with minimal wicks signals decisive institutional intent. A candle with long wicks in both directions suggests indecision, not accumulation. Order block validity requires a violent impulsive move creating a Fair Value Gap. Without this, the zone lacks the institutional force necessary for high-probability trades.
Timeframe selection directly affects reliability. Daily and 4-hour charts produce the strongest order blocks because they reflect larger institutional activity. Blocks on the 15-minute chart exist but carry far less weight unless they align with a higher timeframe zone.

Pro Tip: Mark your order blocks on the daily chart first, then drop to the 4-hour or 1-hour chart to refine your entry. This top-down approach keeps you aligned with institutional structure.
How do you trade order blocks effectively?
Executing trades from order blocks requires clear rules for entries, stop-losses, and targets. Without a defined plan, you will second-guess every setup and make emotional decisions at the worst moments.
Entry methods:
- Limit orders at the order block boundary. Place a buy limit at the top of a bullish order block or a sell limit at the bottom of a bearish one. This is the aggressive approach and gets you the best entry price.
- Confirmation candle entry. Wait for price to reach the order block zone and then form a bullish engulfing or pin bar candle before entering. This reduces false entries but costs you some entry price.
- Limit orders into fresh, higher timeframe aligned order blocks with confirmed liquidity sweeps provide higher probability entries. Waiting for confirmation candles reduces false entries at the expense of entry price.
Stop-loss placement:
- Place your stop-loss beyond the full wick of the order block candle, not just the body.
- Industry standards recommend placing stop-loss orders 10–20 pips beyond the extreme of the order block to protect against volatility and liquidity sweeps while targeting a minimum risk-reward ratio of 1:2.
- A 5–10 pip buffer beyond order block extremes improves survival of trades in volatile conditions. Liquidity sweeps frequently spike just below or above the block before price reverses.
Take profit targets:
- Use the nearest swing high or low as your first target.
- For larger targets, look to the next higher timeframe order block in the direction of your trade.
- A minimum risk-reward ratio of 1:2 keeps your trading math healthy over time. One winning trade covers two losers at that ratio.
Pro Tip: Never move your stop-loss into the body of the order block after entry. That is the most common way traders get stopped out on a valid setup just before price moves in their favor.
What mistakes do traders make with order blocks?
Most order block errors come from skipping the structural validation steps. Recognizing these patterns in your own trading is the fastest way to stop repeating them.
- Treating every supply or demand zone as an order block. Every valid order block is a supply or demand zone but not every supply or demand zone qualifies as an order block. BOS is the primary filter. Without it, you are guessing.
- Trading mitigated blocks as if they are fresh. Order blocks degrade in probability after the first retest as institutional liquidity is absorbed. Fresh order blocks offer the strongest trade opportunities. A block that price has already visited twice is a low-quality setup.
- Placing stops exactly at the block extreme. Stop hunts are real. Institutional algorithms frequently push price just beyond the obvious stop level before reversing. Always add a buffer. Explore stop-loss placement rules to build this habit correctly.
- Overtrading unconfirmed blocks. More setups do not mean more profit. Overcomplicated trading systems built on unconfirmed zones produce inconsistent results and emotional fatigue.
- Ignoring higher timeframe alignment. A 15-minute order block trading against the daily trend is a low-probability bet. Always check whether the higher timeframe structure supports your trade direction.
- Confusing rejection zones with accumulation zones. A rejection zone shows price bounced once from a level. An accumulation zone shows institutional building of positions over multiple candles. The impulsive move and BOS confirm which one you are looking at.
How do order blocks fit into broader market mechanics?
Order blocks exist because of a mechanical reality in institutional trading. Institutional traders use order blocks because they cannot execute large positions in single transactions without moving price against themselves. So they accumulate orders within these zones across multiple candles, leaving a visible footprint on the chart.
This is not mysterious. It is supply and demand at scale. When a bank needs to buy 500 million units of EUR/USD, it cannot do that in one click. It builds the position gradually within a price range. That range becomes the order block. When price returns to that zone, the institution defends its position, which is why price often reverses sharply from these levels.
Layering order blocks across timeframes
| Timeframe | Block strength | Best use |
|---|---|---|
| Daily | Highest | Primary directional bias |
| 4-hour | Strong | Entry zone refinement |
| 1-hour | Moderate | Intraday setups with HTF alignment |
| 15-minute | Low | Confirmation only, not standalone |
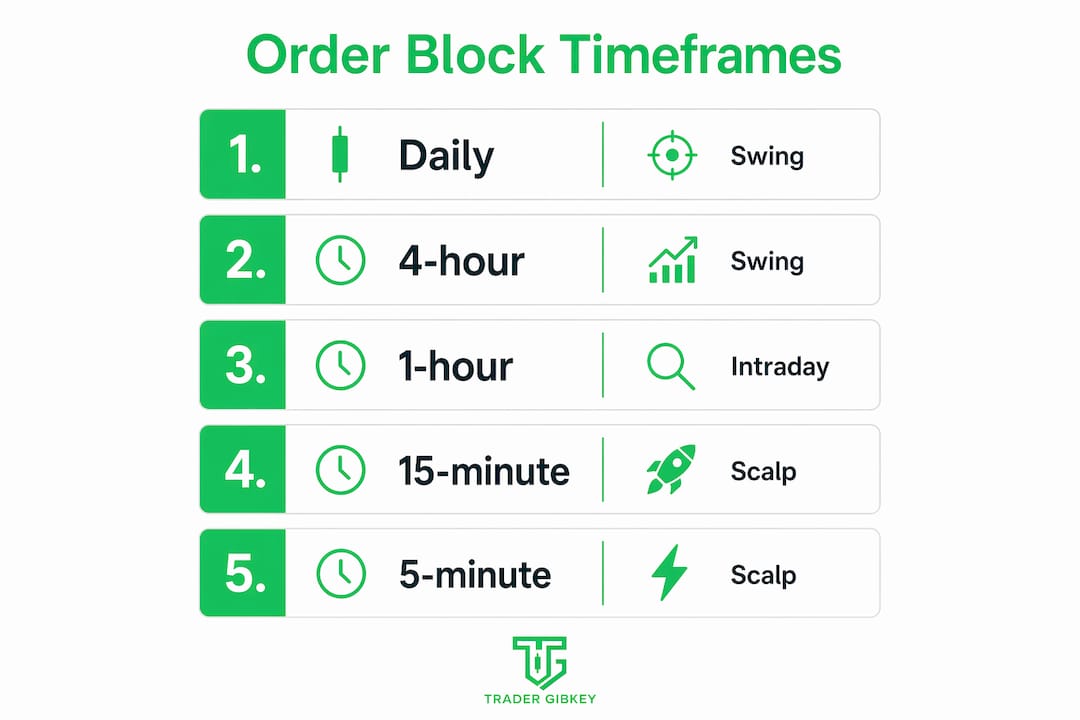
Confluence zones form when a daily order block and a 4-hour order block overlap. These stacked levels carry the most institutional weight and produce the cleanest reversals. Timing your entry on the lower timeframe while anchored to the higher timeframe block is the most consistent approach.
Order blocks also work alongside liquidity sweeps and Fair Value Gaps as part of the broader Smart Money Concepts framework. A liquidity sweep before price enters an order block is one of the strongest confirmation signals available. It shows institutions clearing out retail stop-losses before reversing price in their intended direction.
Key Takeaways
Order blocks are the most reliable institutional footprints in Forex trading when validated by a Break of Structure, a Fair Value Gap, and freshness before entry.
| Point | Details |
|---|---|
| BOS is non-negotiable | Confirming Break of Structure eliminates roughly 60% of false order block signals. |
| Fresh blocks outperform | Order blocks degrade after the first retest; always prioritize untouched zones. |
| Stop-loss placement matters | Place stops 10–20 pips beyond the order block extreme to survive liquidity sweeps. |
| Higher timeframes win | Daily and 4-hour order blocks carry the most institutional weight and reliability. |
| FVG confirms strength | A Fair Value Gap following the impulse confirms institutional force behind the block. |
What 18 years of live trading taught me about order blocks
I have been trading live markets for over 18 years, and order blocks changed how I read price action completely. Before I understood them, I was drawing support and resistance lines everywhere and wondering why price kept blowing through them. The answer was simple. I was marking the wrong zones.
The single most reliable filter I use is freshness combined with BOS. If a block has already been touched, I skip it. No exceptions. The temptation to trade a mitigated block because it “looks strong” has cost me more than almost any other mistake. Institutional liquidity does not regenerate after the first retest. That is just the reality.
What I find most traders get wrong is the stop-loss. They place it right at the candle extreme and get hunted out before price moves. I always add a buffer, and I always check whether a liquidity sweep happened before price entered the block. When those two things align, the setup quality goes up significantly.
Order blocks also taught me patience. Not every session has a valid setup. Waiting for the right conditions, BOS confirmed, FVG present, fresh block, higher timeframe aligned, is what separates consistent traders from frustrated ones. The market rewards discipline, not activity.
— Gabriel
Take your order block trading further with Tradergibkey
Tradergibkey brings over 18 years of live market experience to traders who want real strategies, not textbook theory. If order blocks resonated with you, the next step is understanding how they interact with liquidity sweeps, risk management frameworks, and full trading systems built around institutional price action.
Tradergibkey’s educational resources cover everything from risk management fundamentals to advanced price action setups used in live Forex markets. Whether you are building your first system or refining an existing one, the structured approach at Tradergibkey gives you the tools to trade with confidence and consistency.
FAQ
What is an order block in Forex trading?
An order block is the last opposing candle before a significant impulsive move that breaks market structure. It marks a zone where institutional traders accumulated or distributed large positions.
How do you confirm an order block is valid?
A valid order block requires a confirmed Break of Structure, a violent impulsive move, and ideally a Fair Value Gap. Without BOS, the zone is just a supply or demand area with no structural backing.
Where should you place your stop-loss on an order block trade?
Place your stop-loss 10–20 pips beyond the extreme wick of the order block, not inside the candle body. This buffer protects against liquidity sweeps that frequently spike beyond the obvious level before price reverses.