
Four actions move the needle most on retail Forex profitability: pick the right order type for the scenario, measure and limit slippage, size every position to a fixed percent of risk, and run a repeatable pre-trade checklist before every entry. Master those four and you have the foundation of consistent, improving trade execution. Everything else is refinement.
Start here today:
- Match order type to urgency. Use limit orders for planned entries; reserve market orders for genuine immediacy.
- Log slippage on every trade. If you cannot measure it, you cannot control it.
- Risk 1–2% per trade. Calculate lot size from your stop distance, not from gut feel.
- Run a pre-trade checklist. Check the economic calendar (NFP, FOMC) before touching the order ticket.
- Journal with Average True Range (ATR). Use ATR to set stops and track whether your stop placement is consistent with volatility.
Tradergibkey’s 18+ years of live-market price-action trading are baked into every recommendation below.
Key Takeaways
Disciplined order-type selection, measured slippage control, fixed-percent position sizing, and a repeatable pre-trade checklist are the four execution habits that most reliably separate profitable retail Forex traders from the rest.
| Point | Details |
|---|---|
| Run the pre-trade checklist first | Check session, calendar (NFP/FOMC), spread, and correlation before every order entry. |
| Size to 1–2% risk per trade | Calculate lot size from stop distance: risk amount ÷ (stop pips × pip value). |
| Track fill rate and slippage | Target fill rate above 95%; flag median slippage above 1 pip on major pairs. |
| Use limit orders for planned entries | Limit orders capture better spreads and reduce slippage versus market orders. |
| Tradergibkey mentorship | Structured live drills and journal audits accelerate measurable execution improvement. |
Table of Contents
- What order types should you use for better trade execution?
- How do slippage and spread costs quietly destroy your edge?
- How do you size positions to protect capital and preserve edge?
- What price-action signals give you the best entry timing?
- What does a repeatable pre-trade execution checklist look like?
- How do you practice execution and measure real improvement?
- What execution mistakes and broker red flags should you watch for?
- A sample trade walkthrough from setup to final P&L
- Why disciplined execution beats chasing a better system
- Structured mentorship that accelerates your execution skills
- Sources
- FAQ
What order types should you use for better trade execution?
Order-type selection is the primary lever for controlling price certainty versus execution certainty. Here is a plain-language breakdown of each type and when to use it.
- Market order: Executes immediately at the best available price. Use it only when getting in (or out) right now matters more than the exact price, such as closing a position before a surprise news spike.
- Limit order: Executes at your specified price or better. Use it for planned pullback entries at a support level, where you want price control and can afford to wait.
- Stop order: Triggers a market order when price reaches a set level. Use it for breakout entries or to exit a losing position automatically. Because it converts to a market order on trigger, it can suffer slippage during fast moves.
- Stop-limit order: Triggers a limit order at the stop level. Gives price control but risks no fill if price gaps through your limit. Best for breakouts in liquid pairs during normal sessions.
- Trailing stop: Moves with price by a fixed distance, locking in gains as the trade runs. Useful for trend trades where you want to ride momentum without micromanaging.
- Guaranteed stop-loss: Caps slippage at the exact stop price. Available through select brokers at an added premium; worth considering around high-impact events.
Stops trigger market orders and can suffer large slippage during fast moves or gaps, while limit orders guarantee price but not execution. Knowing that distinction before you place the order prevents a lot of pain.
Pro Tip: Match order type to liquidity and urgency. Use limit orders for passive entries in liquid pairs; switch to market orders only when immediacy is non-negotiable.
How do slippage and spread costs quietly destroy your edge?
Execution quality is a hidden trading cost. Slippage, requotes, and spread widening can materially increase your all-in transaction cost without showing up clearly on any single trade.
Slippage is the difference between your intended price and your actual fill. Requotes happen when your broker cannot fill at the requested price and offers a new one. Spread widening occurs around news releases or thin sessions, inflating the cost of every market order. Asymmetric slippage is the red flag: if your fills are consistently worse than your intended price but rarely better, your broker’s execution model is working against you.
Market orders pay the immediate spread; limit orders often capture a better spread; stop orders convert to market orders and can execute through widened spreads during news. That layering of costs is why measuring execution matters as much as measuring P&L.
Track these metrics on every trade:
- Slippage per trade (in pips)
- Median slippage across 20+ trades
- Slippage as a percentage of stop distance
- Fill rate (filled orders / attempted orders)
- Execution time (milliseconds, if your platform logs it)
How do you size positions to protect capital and preserve edge?
The core rule is simple: risk a fixed 1–2% of your account per trade, calculated from your stop distance, not from a round lot number. For deeper guidance on risk management rules, the Tradergibkey resource library covers the full framework.
Worked example:
- Account size: $10,000
- Risk per trade: 1% = $100
- Stop distance: 50 pips on EUR/USD
- Pip value (standard lot): $10 per pip
- Lot size: $100 ÷ (50 × $10) = 0.20 lots
That math ties your lot size directly to your stop, so a wider stop automatically produces a smaller position. Volatility does the sizing for you.
Practical rules to follow:
- It is recommended to set a daily loss limit to manage risk, typically a small percentage of the account balance.
- Limit total simultaneous open risk across all positions to a moderate percentage of the account to preserve capital.
- Consider reducing position size significantly before high-impact news or low-liquidity sessions to mitigate risk.
- Use ATR to set stops beyond normal noise: 1.5–2× ATR is a widely used volatility-adjusted benchmark.
Pro Tip: Before any NFP or FOMC release, cut your planned lot size in half. Spread widening alone can turn a well-placed stop into a guaranteed loss.
What price-action signals give you the best entry timing?
Price-action confirmations beat indicator-only signals for execution quality because they reflect what price is actually doing at a structural level, not a lagging average of what it already did.
Before entering, look for these confirmations:
- Higher-timeframe trend alignment. Your entry direction matches the daily or 4-hour trend.
- Momentum confirmation. RSI or MACD agrees with the direction on the entry timeframe.
- Volume surge. A volume bar at least 150% of the 20-period average signals genuine participation.
- Clear structural level. Entry is at a defined support, resistance, or order block, not in open space.
- Avoid round numbers. Entries clustered near 1.1000 or 1.1500 attract stop hunts; give yourself a buffer.
For a breakout entry, use a stop order placed just beyond the level and accept that you may pay a wider spread on the trigger. For a pullback entry, a limit order 1–3 pips into the level gives you price control and, in stable markets, a 60–80% fill probability. In volatile conditions, widen the limit distance to improve fill probability, knowing you give up some price improvement.
What does a repeatable pre-trade execution checklist look like?
A checklist removes the emotion from the decision. Run this sequence before every order entry:
- Session check. Confirm you are trading during London or New York overlap for maximum liquidity.
- Calendar check. Open your economic calendar. If NFP, FOMC, or a tier-1 release is within 30 minutes, stand aside or reduce size.
- Correlation check. If you are already long EUR/USD, adding long GBP/USD doubles your USD exposure.
- Liquidity check. Confirm the spread is within normal range. Widened spread = skip or wait.
- Stop placement. Set your stop beyond the structural level, using ATR as a guide.
- Position-size calculation. Run the math: risk amount ÷ (stop pips × pip value) = lot size.
- Order type selection. Limit for planned entries; market only for genuine urgency.
- Comment tag. Paste a one-line note into the order comment field for your journal.
Sample order comment: EURUSD | L | Pullback to 4H support | 50-pip stop | 0.20 lot | NFP clear
This tag takes five seconds and makes your journal review ten times faster.
Pro Tip: If a high-impact event falls inside your decision window, write “EVENT RISK” in the comment and reduce size by at least 50%. Never skip the calendar step.
How do you practice execution and measure real improvement?
Practice paths that actually build skill:
- Demo with latency simulation. Use a demo account during live market hours, not off-hours, so you experience real spread behavior.
- Small-live batches. Trade micro lots on a live account. Real money activates real discipline in a way demo never fully does.
- Focused drills. Spend one session practicing only limit-order placement. Another session, practice only partial exits. Isolate the skill.
Log these metrics in your journal for every trade:
- Slippage per trade and median slippage
- Fill rate
- Expectancy (average win × win rate minus average loss × loss rate)
- R:R distribution
- Execution time
- Checklist pass rate (did you complete every step before entry?)
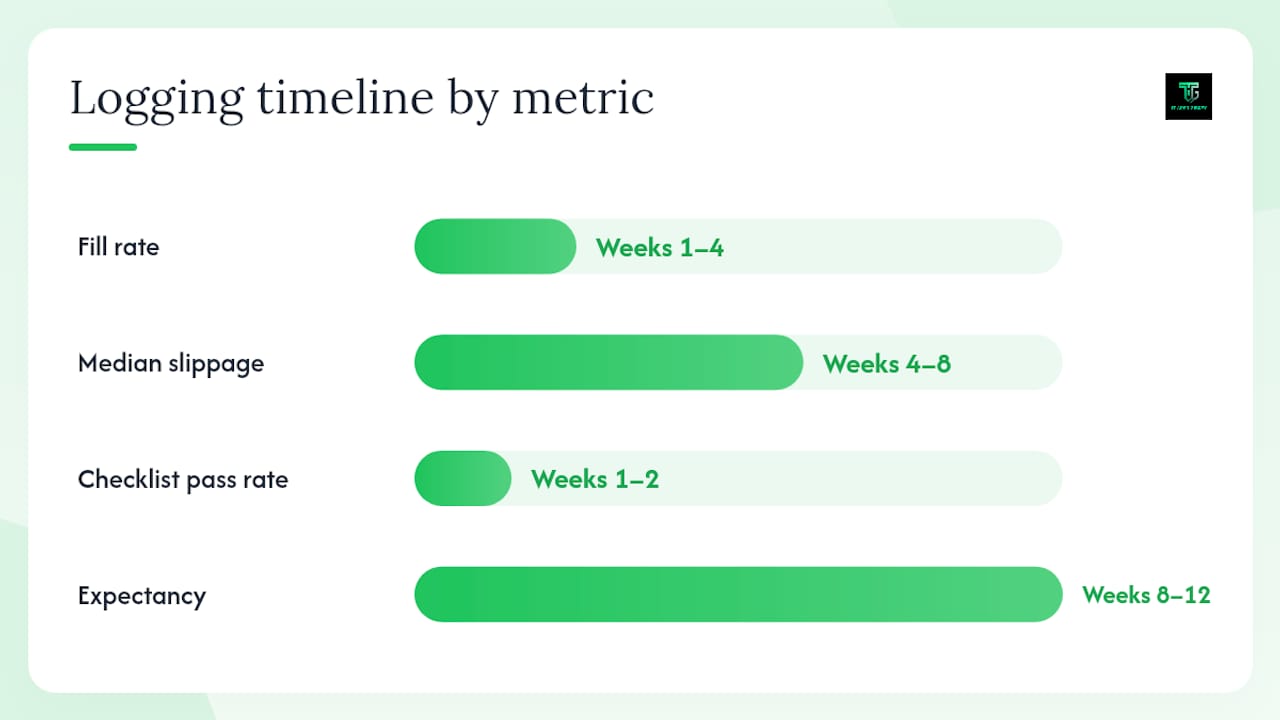
| Metric | Target | Timeline |
|---|---|---|
| Fill rate | >95% | Weeks 1–4 |
| Median slippage | <1 pip on majors | Weeks 4–8 |
| Checklist pass rate | 100% | Weeks 1–2 |
| Expectancy | Positive over 30+ trades | Weeks 8–12 |
Eight to twelve weeks of consistent logging gives you a statistically meaningful picture of your execution quality. For a structured framework on reviewing your trading performance, Tradergibkey’s review templates walk you through the process step by step.
What execution mistakes and broker red flags should you watch for?
The most damaging self-inflicted errors:
- Overusing market orders. Paying the spread every time adds up faster than most traders realize.
- No formal stop-loss. Hope is not a risk management plan. Every trade needs a defined exit.
- Oversized positions. One bad trade should never threaten your account. Size down.
- Trading into high-impact news without a plan. If you have not decided your size and stop before the release, you are gambling.
- Ignoring fill rate. A fill rate below 95% in normal conditions is a measurable cost you are absorbing silently.
Broker red flags to act on immediately:
- Persistent negative slippage asymmetry across 50+ trades
- Fill rate below 95% during normal market hours
- Frequent requotes outside of news windows
- Median execution time above 1,000 ms
When you see these, test the same setup on a demo account with a different execution model (ECN vs. market maker) during the same session. If the demo fills cleanly and your live account does not, contact broker compliance in writing. Understanding why trading systems fail often starts with diagnosing execution, not the strategy itself.
A sample trade walkthrough from setup to final P&L
Here is a realistic EUR/USD pullback trade using the full workflow.
- Setup. Daily trend is bullish. Price pulls back to the 4-hour support zone at 1.0850.
- Checklist passed. Session: London open. Calendar: no tier-1 events within 30 minutes. Spread: 1.2 pips (normal). Correlation: no other USD shorts open.
- Stop placement. ATR (daily) = 60 pips. Stop set at 1.0820 (50 pips below entry), just beyond the structural low.
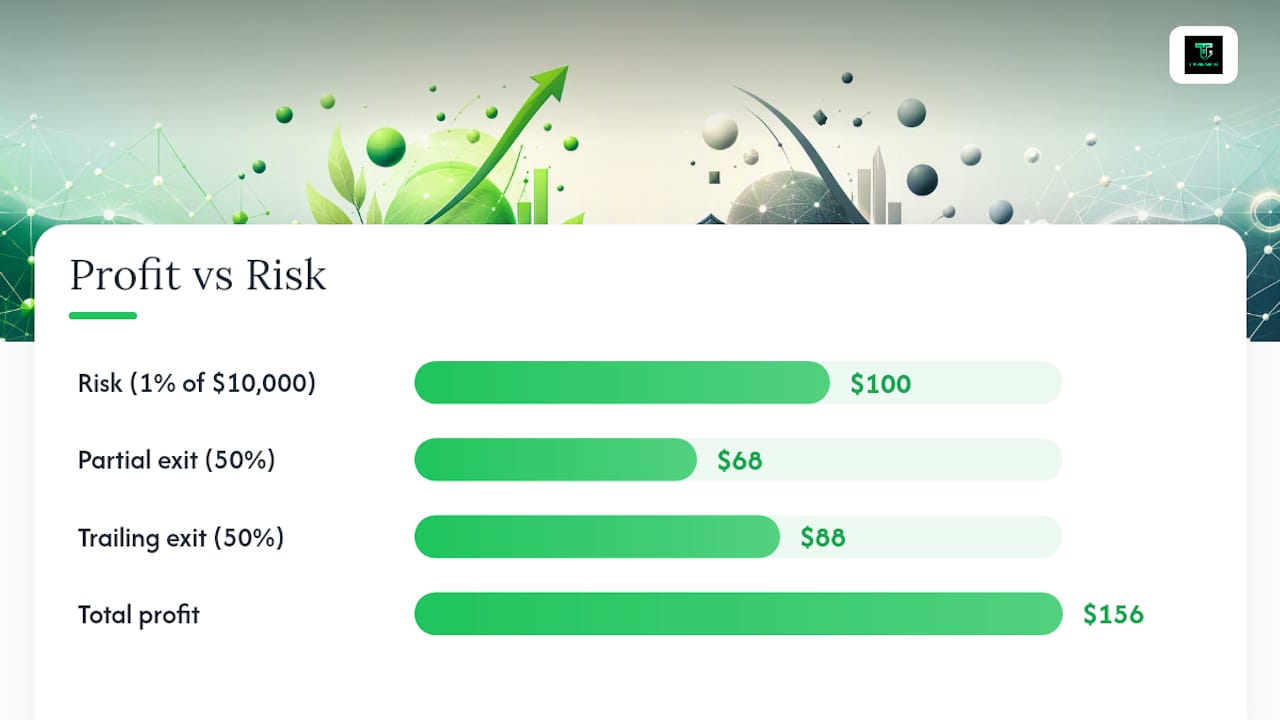
- Position size. Account: $10,000. Risk: 1% = $100. Lot size: $100 ÷ (50 × $10) = 0.20 lots.
- Order entry. Limit order placed at 1.0852 (2 pips into the support zone). Fill confirmed at 1.0852 — zero slippage.
- Take-profit plan. First target at 1.0950 (98 pips, ~2:1 R:R). Partial exit: close 50% at 1.0920 (68 pips), trail the rest with a 30-pip trailing stop.
- Result. Price reaches 1.0920. Partial exit: 0.10 lots × 68 pips × $10 = +$68. Trailing stop closes the remainder at 1.0940: 0.10 lots × 88 pips × $10 = +$88. Total: +$156 on $100 risk. Actual R:R: 1.56:1 after partial exit.
Journal entry: EURUSD | L | 4H pullback | Limit fill 1.0852 | 0 slip | Partial 1.0920 | Trail close 1.0940 | R:R 1.56
In this example, a limit order at a structural level provided a controlled entry and the use of partial exits plus trailing stops helped manage risk and capture profit.
Why disciplined execution beats chasing a better system
After 18+ years of live Forex trading, the pattern I keep seeing is the same: traders who struggle are almost always looking for a better indicator or a new strategy when the real problem is execution. They enter too early, size too large, skip the checklist, and then blame the setup when the trade goes wrong.
Price-action execution is not glamorous. It is running the same checklist, logging the same metrics, and sizing the same way, trade after trade. But that repetition is exactly what builds an edge that compounds. The traders who come through Tradergibkey’s mentorship and genuinely improve are not the ones who found a secret signal. They are the ones who committed to measuring their execution and fixing what the numbers revealed. You can read more about the practical experience that separates consistent traders from the rest.
Structured mentorship that accelerates your execution skills
Knowing the rules is one thing. Applying them under live-market pressure, with real money and real spreads, is another. Tradergibkey’s structured mentorship program is built around exactly that gap.
Students get live execution drills during real market sessions, one-on-one journal audits that identify slippage patterns and sizing errors, and weekly market reviews that connect price-action theory to current setups. The community accountability layer means you are not practicing alone.
- Live execution drills: Practice order-type selection and checklist workflow in real market conditions.
- Journal audits: Get direct feedback on your fill rate, slippage distribution, and R:R consistency.
- Weekly market reviews: See how the week’s setups aligned with the execution rules covered in the course.
If you are ready to move from knowing the rules to actually trading them, visit Tradergibkey to learn more or book a mentorship intake session.
Sources
- Mastering order types in currency & futures trading | OANDA
- Forex execution quality – slippage, requotes & best execution | ForexMechanics
- Forex Broker Execution Models 2026: ECN, STP, Market Maker | Pipspal
- Stop and limit order mechanics: precision risk management and entry optimization | Pomegra Learn Library
- Forex
- Checklist for perfect trade entry and exit | For Traders
This article is general information, not a substitute for advice from a qualified financial advisor. Consult a qualified financial professional about your own circumstances before acting on anything here.
FAQ
What is the single most important trade execution habit for profitability? Running a pre-trade checklist before every entry. It removes emotion, catches calendar risk, and forces correct position sizing before you touch the order ticket.
How long does it take to see measurable improvement in execution quality? Most traders see meaningful improvement in fill rate and slippage metrics within 8–12 weeks of consistent journaling and focused practice drills.
Should beginners use market orders or limit orders? Limit orders for planned entries. They give you price control and typically capture a better spread than market orders, which is especially important when your account is small.